Chocolate Orange Cheesecake

This is a deceptively simple and decadently delicious dessert!

With these ingredients you can make 1 large cheesecake or 6-8 individual servings

300g biscuits
50g finely chopped crystallized ginger
100g butter (melted)
30ml coconut oil

250g Cream cheese (soft)
100g Icing sugar
250ml cream
100g dark chocolate
50ml oange syrup*
* substitute juice and grated peel of 1 orange
2tbsp lime juice
**optional
Whipped cream & Candied peel or grated orange rind to decorate

Crush the biscuits with a blender, or in a Ziploc bag and smash with rolling pin
Melt the butter and stir in coconut oil, crushed biscuits and ginger

Press firmly into a 9″ springform tin (or divide into individual tins) and refrigerate for 2 hrs.

Melt chocolate and allow to cool while preparing the next ingredients.

Whisk the cream cheese and icing sugar until smooth

Whisk in orange syrup and lime juice

In a separate bowl whisk cream until it is stiff

Whisk the cream into the cream cheese and icing sugar mixture

Fold in the melted chocolate using a rubber spatula

Pour the topping onto the base and refrigerate until set (6 hrs +, overnight if possible)

Remove from the tin and top with whipped cream and candied peel or grated orange rind

Simple, delicious and a real treat!

Continue reading

Vegan Chocolate cake*

*Magic Science Cake 

Dairy free delicious chocolate sponge.

I first made this for a school bakesale to treat some dairy free / vegan staff who always seemed to get left out of the cake tables. In all honesty when first looking at the ingredients I wasn’t convinced it would be a success. It has since become my ‘go to’ chocolate cake. Its a super easy all in one bake that just about everyone can enjoy.

The size of tin required is 23cm x 33cm ( 9in x 13in)

Line your tin and preheat oven to 350 degrees ( gas mark 4)

Ingredients 20200523_131557

400g ( 3 cups) flour

350g ( 2 cups) sugar

70g ( 1/2 cup) cocoa powder

2 tsp baking powder

1 tsp salt

175 ml ( 3/4 cup) coconut / sunflower oil

2 tbsp while vinegar

2 tbsp vanilla essence

500 ml ( 2 cups) hot water

Cocoa powder ( or icing sugar to decorate)

Method 

In a large bowl place flour ( 400g), sugar ( 350g) , cocoa ( 70g), baking powder ( 2tsp), salt ( 1tsp ) and mix well.

Add oil ( 175ml), while vinegar ( 2tbsp), vanilla ( 2 tbsp), and stir  ( it will be quite lumpy at this point)

Add hot water ( 500ml) and stir until smooth. Bubbles will begin to form on the surface at this, this is normal!

Pour into your tin and allow to sit for a few minutes.

Place into oven for 35-40 minutes.

Allow to cool in tin for 10 minutes, then transfer to wire rack to cool completely.

Decorate with cocoa powder and enjoy.

20200523_162954

HillyWilly


3 Ingredient* Ice-Cream

*Ok So I used 4… and there are a ton of variations that could make it WAY over 3, but the basic recipe requires only 3 ingredients!

Sumptuous, rich, sweet and creamy. What more can you want from ice-cream?

Ingredients

500 ml whipping creamIngredients

400 ml condensed milk

2 tbsp Vanilla essence

** a handful of chocolate chips

Method

Mix the condensed milk (400 ml)  and vanilla (2 tbsp) in a small bowl or jug.

In a large metal bowl whip the cream (500ml) for several minutes until it stands in stiff peaks.

Turn your mixer speed to low and gradually mix in the condensed milk and vanilla mixture to the whipped cream until fully incorporated.

** Gently fold in a handful (or two!) of dark chocolate chips.

Pour into a freezer safe container. Place a small piece of baking paper on top of the mixture before you put the lid on, and put it in the freezer.

Give it a good stir every few hours, scraping down the sides of the container to ensure even freezing. Freezing time will vary depending on the shape and volume of your container, but 8-10 hours is recommended.

And that’s it.

Homemade luxury vanilla ice cream.

If you want to jazz it up a bit you can add just about anything…

For a different flavour just replace the vanilla with anything you fancy. A strong espresso blend would work, or a fruit concentrate.

If you want to add ‘bits’ do that just before you pour into your freezer safe container. Diced fruit, chocolate chips, chopped nuts, a handful or two of whatever takes your fancy.

If you want a swirl of sauce just fill your container in increments and layer with dessert sauce before freezing.

I will be working out a chocolate version at some point and I will update this post when I do. But for now we have almost a litre of chocolate chip to get through first so it could be a while… although probably not that long!!

20200428_233852-1

HillyWilly


Auld Alliance Apple cake

This is one of my favourite ‘standby’ recipes adapted from an original recipe for French vanilla apple cake , (which can be found here) but of course  couldn’t just leave it alone .

I added a little ( quite a lot) of cinnamon and a tiny bit ( well maybe more than a tiny bit)  of whisky and the ‘Auld Alliance apple cake was born!)

This is equally delicious served warm with cream, custard or ice cream or completely alone with a nice brew.

IMG_20200330_225655_012

INGREDIENTS

1 cup  / 125 g all-purpose flour

1 tsp baking powder

1/4 tsp salt

1 stick / 1/2 cup/ 115g unsalted butter, at room temperature

2/3 cup / 130g granulated sugar (plus more for sprinkling over cake)

2 large eggs

2 tsp vanilla extract

4 tbsp whisky

3 apples, peeled, cored and cut into 1/2-inch cubes

2 tbsp ground cinnamon ( in large zip lock bag)

INSTRUCTIONS

Preheat the oven to 350°F / gas mark 4. Grease a 9-inch springform or regular cake tin with butter or nonstick cooking spray or use baking parchment to line the tin

In a small bowl whisk together the flour, baking powder and salt.

Using a handheld mixer with beaters or a stand mixer with the paddle attachment, cream the butter and granulated sugar until light and fluffy ( about 3 minutes )

Add the eggs, one at a time, beating well and scraping down the sides of the bowl after each addition. Add 1 tbsp of your flour with each egg.  Beat in the vanilla and whisky.

Don’t worry if the batter looks grainy at this point; that’s okay.

Add the remainder of the flour mixture and mix on low speed until just combined.

Place the apple cubes into zip lock bag with cinnamon and shake vigorously until apples are coated in cinnamon

Using a rubber spatula, fold in the chopped apples.

Scrape the batter into the prepared tin and even the top. Sprinkle evenly with 1 tablespoon of granulated sugar.

Bake for about 40 minutes, (or until the cake is golden and a toothpick inserted into the centre comes out clean)

Allow the cake to rest in tin for 10-15 mins then turn out on to a cooling rack

.


Freezer Friendly Instructions: The cake can be frozen for up to 3 months. After it is completely cooled, cover it tightly with aluminium foil or freezer wrap. Thaw overnight on the counter top before serving.


I hope you enjoy this cake as much as I do. A real ‘tea-time’ standard in HillyWillys Kitchen

See you next time.

Nutella* Brownie Bars

So many apologies for not posting recently, but I hope you will forgive me when you see what I’ve got for you today 🙂

My friend posted a recipe link on Facebook and I just couldn’t resist…

I made them but found they were a little too squidgey for my liking and the modification began 🙂

They are so simple to make and ideal for a kids baking project. Small person whipped them up in a matter of minutes.

200g of nutella*
2 medium eggs
200g flour
20cl milk

*nutella is of course a brand name, but most supermarkets will sell this as chocolate hazelnut spread.

Put all the ingredients in a large bowl and mush them all together until well mixed.

This is where you can add a handful of whatever you like to give it a little texture. I halved the mixture and added a handful of crushed peanuts to one half and a handful of sugar balls ( more usual on the top of cakes I know, but they make a really fun multicoloured interior for small people)

Stir any of your extra ingredients into the mixture and it’s ready to be baked.

If, like me, you have two flavours but only one want to do one bake, just line your tin with paper as normal, but make a peak fold in the middle and voila, as they say in these parts, you can fill up each half with a different mixture.

Bake at 200 degrees for around 20 minutes, until you can poke it with a cocktail stick and it comes out with a tiny smudge of mixture on it. You have to make sure you don’t over bake this as it is supposed to be slightly gooey in the centre.

Leave to cool in the tin for 15 minutes then transfer onto a cooling rack. As tempting as it is to dive straight in it’s best to try and wait at least 30 minutes so they don’t crumble too much when you cut them.

When cooled, cut into bars or squares and store in an airtight tin.

20130601-175222.jpg

**more pictures will be uploaded as soon as small person has stopped hogging the pc 🙂

Chocolate Lime Macaroons

Well hello there. It’s been a while I know, but I just haven’t been feeling the baking mojo of late. A seemingly endless round of family illness and grotty cold weather had left me feeling rather uninspired.

The good news is that this week the sickness has abated and I’m slowly getting back into the kitchen 🙂

My first post flu cravings were for comfort and sweetness. What better than a coconut macaroon to cheer me up. But, as it’s me in the kitchen, it’s a coconut macaroon with a twist. Of course I turned to chocolate as a first choice, but i thought this might make it a little sickly and there was a little extra something needed to take the edge off so I dabbled with a little lime. The results were just what I needed.

This is a very simple recipe and quite quick to make too. They are ideal as a biscuit replacement with your afternoon cuppa, but pretty enough to be served at a high tea.

Chocolate Lime Macaroons

2 egg whites
100g caster sugar
160g desiccated coconut
Grated zest of 1 lime
Juice of 1/2 a lime ( reserve the rest in case your mixture isn’t quite wet enough)

???????????????????????????????

200g dark chocolate

50ml single cream

Place all of the ingredients into a large bowl and mix together. The best way of doing this is with your hands. It will feel very dry to start with but you really need to squeeze the ingredients till they start to come together. If it’s not pressing together add the reserved lime juice 1 tsp at a time.

???????????????????????????????

Turn out your mixture onto a greaseproof sheet and press it firmly into a square about 1 cm thick.
???????????????????????????????
Take a small cookie cutter and press firmly into the mixture.
???????????????????????????????
Very gently transfer to a lined baking sheet. You will need to be quite delicate when easing the shape out onto the tray as this is a VERY crumbly mixture.

Keep cutting and repressing your mixture until it is all used. I had enough to make 24 hearts.
???????????????????????????????
Place the tray in an oven preheated to 180degrees for 10- 15 minutes, just until the coconut has started to brown.

Remove from the oven and let cool on the tray for 5 minutes to allow them to firm up a little before placing on a wire cooling rack.
???????????????????????????????
When the macaroons are completely cool melt the chocolate and stir in the cream until it is completely blended.
???????????????????????????????
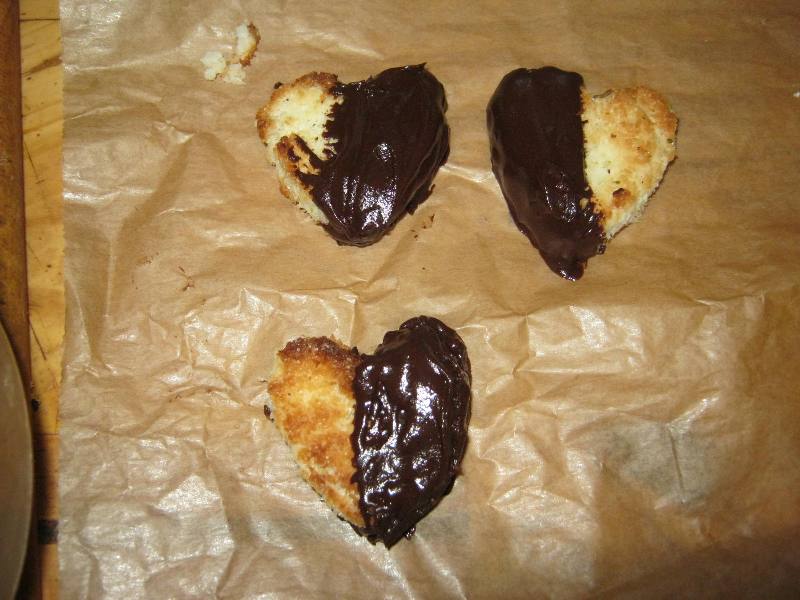
Dip the macaroon in the chocolate ganache and place onto greaseproof paper  until the chocolate is set.
???????????????????????????????
These can now be kept for up to a week, ( if you have a stronger will that I ), in an airtight container.
???????????????????????????????
A Bientôt.

Apple and Ginger Surprise Loaf

What’s the surprise? (I hear you ask)
The surprise is that I made it.
I was actually just in the kitchen making a coffee and bemoaning the lack of biscuits to go with said coffee and my eyes began to wander and before I knew what was happening I had a bowl full of cake mix in front of me.

I was going to knock up a batch of biscuits as cheeky treat, but then I noticed a banana that had seen better days loitering in the fruit bowl trying it’s best to corrupt a lonesome apple and my head decided that the best place for them was inside a cake, rather than have them join forces and ruin what was left of the innocent ginger root. Ah now ginger, that would be nice with apple….

So the mixing began in earnest and i remembered the tin of chrystallised ginger in the cupboard that I’ve been forgetting about for the last 2 months, and when I was rummaging I found a jar if ginger syrup ( left over from the chrystallising ). Then I thought this might actually turn out to be rather awesome and I really should be taking pictures for the blog, but as my camera was in the somewhere, and my iPad was charging in the somewhere else I just decided to crack on before the baking muse decided to join them. It also occurred to me that I should probably be writing this down. And measuring the ingredients rather than just chucking and sloshing.

The following is a recipe of all the things I remember putting in it, in their approximated quantities. And even if I do say so myself it’s rather delicious.

Apple & Ginger loaf.

*75g Butter (softened)
*50g Sugar
1 Egg
*275g Flour
*2 level tsp Baking powder
1 overripe Banana
**75ml Ginger Syrup
**75ml Creme Fraiche
1 Apple (peeled and diced)
**100g Chrystallised Ginger ( finely chopped )

*these ingredients I did measure
**these ingredients I didn’t, but its a good ‘guesstimate’

In a large mixing bowl cream the butter and sugar until pale and smooth.
Beat the egg and stir in gradually, adding a spoonful of flour each time you add some egg to avoid curdling. When all the egg has been stirred in , sift in the rest of the flour and baking powder and stir well.

In a smaller bowl mash the banana and mix with the ginger syrup and creme fraiche, then add this to your large bowl and stir well. The mixture should be slightly ‘gloopy’ in consistency, but not quite pourable. If it is too dry at this point add a little more creme fraiche. Now throw in the chopped apple and chrystallised ginger and mix thoroughly.

Transfer the mixture to a 2lb greased and lined loaf tin, cover the top loosely with greaseproof paper and place in an oven preheated to 170degrees. Bake for 1 hr and 15 minutes then uncover and return to the oven for 15-20 minutes. Poke a skewer or knife into the centre of the cake and if it comes out clean then it’s done. If not return to the oven for a further 10-15 minutes ( you may need to recover the top to stop it getting singed).

20130221-225841.jpg

Take out of the oven and leave in the tin for 15 minutes, then remove it, take off the lining paper and leave on a cooling rack for as long as you can. The longer you leave it too cool, the easier it is to slice, but if you are impatient like I am, warm chunks are more than acceptable.

20130221-225942.jpg

A Bientôt.

Marvellous Moreish Muffins

I haven’t actually been in the kitchen very much of late as my lovely hubby has been cooking up a succession of delicious curries and Thai dishes for us, I’m hoping he’ll guest spot here one day with his fabulous spicy pork salad but up till now he can’t be persuaded.

That said I have been allowed in to make the odd dessert or two and I have found one of the simplest and most reliable muffin recipe I’ve ever used. And this is what I’m going to share today. This is a quick bake too- no more than 30 minutes start to finish.

This is so simple and delicious that it’s great for novice bakers, kids and old hands alike, and the variety of flavours are as limitless as your imagination!

I will start by giving the plain muffin mix recipe and method then go through a few variations after. These ingredients are enough for 6 large muffins. If you happen to have run out of muffin cases then it works just as well in cupcake cases and you will get 10 ( guess how I found that out!)

Marvellous Moreish Muffins.

In a Bowl

150g Plain Flour
1tsp baking powder

In a large Jug

1 egg
60g sugar
2tbsp oil
100ml milk
1/2 tsp vanilla essence
ingredients (Now for the chocoholics amongst us if you want to make chocolate sponge as well, simply replace 25g of your flour with cocoa powder)
Mix the egg,milk, oil and sugar together in the jug.

Pour the egg mixture into the bowl gradually and mix until combined *
IMG_3232
Spoon mixture into cake cases and put the tray in the oven at 160C for 20 until set and cracked at the top if not quite set put back in for a further 5-10 mins
So the plain muffins are delicious, but they are well, plain so let’s have some fun!

*Just before you spoon the mixture into the cups is a great time to start being creative. You can add just about anything here, chunks of fruit, chocolate, nuts or combinations of all 3 of those things. I have found that around 100g of ‘extras’ is about right, but if you are adding things like oats or desiccated coconut you may need a tiny bit more milk as they will absorb some of the moisture in your mix.
IMG_3233
(Now for the chocoholics amongst us if you want to make chocolate sponge as well, simply replace 25g of your flour with cocoa powder)

Here are a few flavours I’ve already tried;
Oatmeal honey and raisin
Apple and cinnamon
Chocolate chunk
Chocolate cranberry and coconut.
Marvellous Moreish Muffins
I’m quite sure I’ll be making more, I’m already tempted for a chocolate and orange, but do let me know what flavours are your favourite.

A Bientôt

Candy Cane Cut-Out Cookies

It was time for a post festive season clear out of the snack-shelf* and I came across the remnants of the candy canes. A little the worse for wear and held in shape only by their cellophane wrapping.
Most normal people would have just dumped them in the bin, but I’ve never in my life claimed to be normal so it was into the kitchen they came to be used in ….. something…. The something turned out to be cookies, not your ordinary cookies, but cut out cookies of course!

I have a nifty little cutter that cuts holes in the centre of your cookie shape, but if you dont have one all you need is one large ( 4-5 cm) and one small (2-3cm), which will do the job perfectly.

This is a great bake to do with small people it’s a lot of fun with tasty and good looking results. We got a little carried away ( I know, you’re stunned) and decided to colour our dough as well, this is not strictly necessary, but it is really pretty 🙂

If you don’t happen to have any candy canes kicking about in your kitchen then any kind of boiled sweet or hard candy will be fine.

This recipe should yield between 20-30 biscuits
*it started out as small persons snack box, but has gradually grown and taken over a whole pantry shelf. Oops.

Candy Cane Cut-Out Cookies

225g Flour
1tsp Baking Powder
Pinch of Salt
150g Butter
75g Sugar
25g Icing Sugar
1 beaten Egg
5 Candy Canes ( or a handful of boiled sweets )

Sift flour, baking powder and salt into a large bowl. Cube the butter and rub into the flour until it looks like breadcrumbs. Add the sugar and stir in then sift the icing sugar and mix well. Mix to a stiff dough with the beaten egg then turn out onto a lightly floured surface and kneed well.

The next step is optional 🙂

Split the dough into 3 roughly equal parts and add a few drops of food colouring to each part and kneed until you get an even colour. ( it’s advisable to wear some gloves at this point unless you want technicolour hands for the rest of the day.

Place the dough into plastic bags and chill for at least 30 minutes.
roll out dough
Roll out your dough to between 1/4 and 1/2 cm thickness, cut your shapes and place onto greaseproof paper (VERY important not to bake them directly on the baking tray /cookie sheet).
place cookies on paper
Take your candy canes or boiled sweets and smash into small pieces, place a small piece of candy into the hole of each cookie.
place sweets in centreNow… you can of course reuse the ‘middle bits’ and re roll, or… you could place them along side and have lots of very cute tiny biscuits too 🙂
Place in an oven pre-heated to 180 degrees and bake for between 10 and 15 minutes. Take them out as the cookie begins to brown and the candy is a bubbling liquid.
take out of oven
Leave then on the tray for 10 minutes before moving to a cooling rack as this will allow time for the candy to solidify.
cool on paper first
Once completely cooled store in an airtight container, or just eat them straight away!!

yummy cookies

Cranberry, Orange and Cinnamon Muffins

Happy New Year!

Yes I know, it’s a little belated but we have all been under the weather here in the last few weeks, fortunately Christmas itself was sickness free, but we’ve been making up for it since…

Now that the veil of flu is lifting from HillyWillys house, it’s long past time to get back into the kitchen.

After the most wonderful Christmas eve meal small person and a sumptuous dinner from Hubby the kitchen has been a relatively HillyWilly free zone. Time to put that right 🙂

But what to cook? After the excess eating of Christmas and new year I thought perhaps I should try something slightly less …. decadent, but still super tasty of course so I have opted to give you some healthy, low fat muffins, I can assure you they are still delicious and as they are lower in fat that means you can eat more of them…… 😉

Cranberry, Orange and Cinnamon Muffins.

300g flour
1tsp Baking Powder
25g Brown Sugar (plus a little extra to sprinkle on top)
1tsp Cinnamon
1 Orange (zest and flesh)
100g Dried unsweetened Cranberries
100ml Skimmed Milk
100ml Orange Juice
1 Egg
25g Salted Butter ( melted )

About an hour before you are ready to bake soak the cranberries in the orange juice. This will give them a nice plumpness and add a bit of sharpness to the flavour.

20130108-162305.jpg

In a large bowl mix the flour, baking powder, brown sugar and cinnamon.
Add to this the zest and flesh of your orange and the drained cranberries and stir well.

20130108-162430.jpg

In a separate bowl beat the egg and add the milk and orange juice and stir well. Melt the butter and whisk it into the liquid. If you wish to substitute the butter for sunflower oil you can do so, but don’t forget to add a generous pinch of salt.

Add the liquid to the dry bowl and beat until fully combined.

20130108-162524.jpg

Divide the mixture into muffin cases ( this amount should make 12) and place in a preheated oven.bake at 200degrees for 20-25 minutes.

20130108-162638.jpg

When the muffins come out you can if you wish add a sprinkle of brown sugar to the top, or if you are being really good you can skip this step 🙂

20130108-162729.jpg

Allow to cool and enjoy.

A Bientôt.