Nutella* Brownie Bars

So many apologies for not posting recently, but I hope you will forgive me when you see what I’ve got for you today 🙂

My friend posted a recipe link on Facebook and I just couldn’t resist…

I made them but found they were a little too squidgey for my liking and the modification began 🙂

They are so simple to make and ideal for a kids baking project. Small person whipped them up in a matter of minutes.

200g of nutella*
2 medium eggs
200g flour
20cl milk

*nutella is of course a brand name, but most supermarkets will sell this as chocolate hazelnut spread.

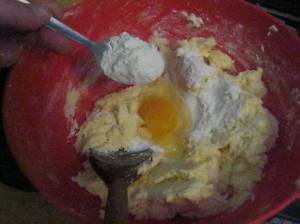
Put all the ingredients in a large bowl and mush them all together until well mixed.

This is where you can add a handful of whatever you like to give it a little texture. I halved the mixture and added a handful of crushed peanuts to one half and a handful of sugar balls ( more usual on the top of cakes I know, but they make a really fun multicoloured interior for small people)

Stir any of your extra ingredients into the mixture and it’s ready to be baked.

If, like me, you have two flavours but only one want to do one bake, just line your tin with paper as normal, but make a peak fold in the middle and voila, as they say in these parts, you can fill up each half with a different mixture.

Bake at 200 degrees for around 20 minutes, until you can poke it with a cocktail stick and it comes out with a tiny smudge of mixture on it. You have to make sure you don’t over bake this as it is supposed to be slightly gooey in the centre.

Leave to cool in the tin for 15 minutes then transfer onto a cooling rack. As tempting as it is to dive straight in it’s best to try and wait at least 30 minutes so they don’t crumble too much when you cut them.

When cooled, cut into bars or squares and store in an airtight tin.

20130601-175222.jpg

**more pictures will be uploaded as soon as small person has stopped hogging the pc 🙂

Marvellous Moreish Muffins

I haven’t actually been in the kitchen very much of late as my lovely hubby has been cooking up a succession of delicious curries and Thai dishes for us, I’m hoping he’ll guest spot here one day with his fabulous spicy pork salad but up till now he can’t be persuaded.

That said I have been allowed in to make the odd dessert or two and I have found one of the simplest and most reliable muffin recipe I’ve ever used. And this is what I’m going to share today. This is a quick bake too- no more than 30 minutes start to finish.

This is so simple and delicious that it’s great for novice bakers, kids and old hands alike, and the variety of flavours are as limitless as your imagination!

I will start by giving the plain muffin mix recipe and method then go through a few variations after. These ingredients are enough for 6 large muffins. If you happen to have run out of muffin cases then it works just as well in cupcake cases and you will get 10 ( guess how I found that out!)

Marvellous Moreish Muffins.

In a Bowl

150g Plain Flour
1tsp baking powder

In a large Jug

1 egg
60g sugar
2tbsp oil
100ml milk
1/2 tsp vanilla essence
ingredients (Now for the chocoholics amongst us if you want to make chocolate sponge as well, simply replace 25g of your flour with cocoa powder)
Mix the egg,milk, oil and sugar together in the jug.

Pour the egg mixture into the bowl gradually and mix until combined *
IMG_3232
Spoon mixture into cake cases and put the tray in the oven at 160C for 20 until set and cracked at the top if not quite set put back in for a further 5-10 mins
So the plain muffins are delicious, but they are well, plain so let’s have some fun!

*Just before you spoon the mixture into the cups is a great time to start being creative. You can add just about anything here, chunks of fruit, chocolate, nuts or combinations of all 3 of those things. I have found that around 100g of ‘extras’ is about right, but if you are adding things like oats or desiccated coconut you may need a tiny bit more milk as they will absorb some of the moisture in your mix.
IMG_3233
(Now for the chocoholics amongst us if you want to make chocolate sponge as well, simply replace 25g of your flour with cocoa powder)

Here are a few flavours I’ve already tried;
Oatmeal honey and raisin
Apple and cinnamon
Chocolate chunk
Chocolate cranberry and coconut.
Marvellous Moreish Muffins
I’m quite sure I’ll be making more, I’m already tempted for a chocolate and orange, but do let me know what flavours are your favourite.

A Bientôt

Candy Cane Cut-Out Cookies

It was time for a post festive season clear out of the snack-shelf* and I came across the remnants of the candy canes. A little the worse for wear and held in shape only by their cellophane wrapping.
Most normal people would have just dumped them in the bin, but I’ve never in my life claimed to be normal so it was into the kitchen they came to be used in ….. something…. The something turned out to be cookies, not your ordinary cookies, but cut out cookies of course!

I have a nifty little cutter that cuts holes in the centre of your cookie shape, but if you dont have one all you need is one large ( 4-5 cm) and one small (2-3cm), which will do the job perfectly.

This is a great bake to do with small people it’s a lot of fun with tasty and good looking results. We got a little carried away ( I know, you’re stunned) and decided to colour our dough as well, this is not strictly necessary, but it is really pretty 🙂

If you don’t happen to have any candy canes kicking about in your kitchen then any kind of boiled sweet or hard candy will be fine.

This recipe should yield between 20-30 biscuits
*it started out as small persons snack box, but has gradually grown and taken over a whole pantry shelf. Oops.

Candy Cane Cut-Out Cookies

225g Flour
1tsp Baking Powder
Pinch of Salt
150g Butter
75g Sugar
25g Icing Sugar
1 beaten Egg
5 Candy Canes ( or a handful of boiled sweets )

Sift flour, baking powder and salt into a large bowl. Cube the butter and rub into the flour until it looks like breadcrumbs. Add the sugar and stir in then sift the icing sugar and mix well. Mix to a stiff dough with the beaten egg then turn out onto a lightly floured surface and kneed well.

The next step is optional 🙂

Split the dough into 3 roughly equal parts and add a few drops of food colouring to each part and kneed until you get an even colour. ( it’s advisable to wear some gloves at this point unless you want technicolour hands for the rest of the day.

Place the dough into plastic bags and chill for at least 30 minutes.
roll out dough
Roll out your dough to between 1/4 and 1/2 cm thickness, cut your shapes and place onto greaseproof paper (VERY important not to bake them directly on the baking tray /cookie sheet).
place cookies on paper
Take your candy canes or boiled sweets and smash into small pieces, place a small piece of candy into the hole of each cookie.
place sweets in centreNow… you can of course reuse the ‘middle bits’ and re roll, or… you could place them along side and have lots of very cute tiny biscuits too 🙂
Place in an oven pre-heated to 180 degrees and bake for between 10 and 15 minutes. Take them out as the cookie begins to brown and the candy is a bubbling liquid.
take out of oven
Leave then on the tray for 10 minutes before moving to a cooling rack as this will allow time for the candy to solidify.
cool on paper first
Once completely cooled store in an airtight container, or just eat them straight away!!

yummy cookies

Red nose Reindeer Biscuits

It’s become something of a tradition that I bake a batch of christmassy biscuits for small ones class just before the holidays and I saw these and thought they were perfect.

But I must begin with a confession.

This blog post features my 2nd attempt at these biscuits.

When I made the first batch they didn’t turn out so well.  I saw pictures posted on-line by the lovey Alex at Sugar Plum Patisserie and got over excited, grabbed the cookie dough that was languishing in the bottom of my fridge and started baking.

Well had I actually thought about it I would have realized that the dough in my fridge was far to soft and would totally lose any shape that I had moulded it in as soon as I put it in the oven, and the decorations would not stand up!
The results were tasty, but the look was … not quite as intended.
In the ever sobering words of small person “I like your biscuits mum, but why have you made them with big bushy eyebrows?”

Time for a second attempt.

Red Nose Reindeer Biscuits (mark 2)

For the sugar dough

sugar dough ingredients

400g Flour
1/2 tsp Baking Powder
225g Butter
200g Sugar
2 Eggs
1 tsp Vanilla essence

For the decoration

decorations
Chocolate chips
Salted pretzels (traditional knots snapped in half)
50g dark chocolates (melted)
Small red sweets (smarties, jelly sweets, foam strawberries. All are fine!)

Cream together the butter and sugar until pale and fluffy. Beat in the eggs one at a time, add a teaspoon of flour with each egg to avoid curdling.

making the dough
Add the vanilla essence and beat well.
Sift the flour and baking powder and fold in gradually.
When the mixture comes together turn out onto a floured surface and kneed till smooth.

Dough!
Place the dough in a plastic bag and refrigerate for minimum of an hour.

Roll out your dough and cut into triangles.
Place the triangles on your baking sheet and pinch the top corners to make ear shapes.

pinch to make 'ears'

Bake at 170 degrees for 8-10 minutes, until just turning golden brown.

Now you have to work fast.

First take your pretzels (2 for each biscuit) and push them into the top of your biscuits to make the antlers. Then take chocolate chips and press into the biscuit to make the eyes. This must be done when the biscuit is still soft, or they will fall off when you move them.

pretzels and choc chips

Allow them to rest on the baking tray for 5 minutes, then move them to a cooling rack.

When the biscuits are completely cool, melt the chocolate and spread a small amount on the bottom of your triangle.

chocolate nose

While the chocolate is still warm press a red sweet into it, then allow the chocolate to harden completely.

Rudolph!
Not a bushy eyebrow in sight.

These are such a fun Christmas treat for kids and also great for kids to make with you.

I hope you enjoy them as much as small persons classmates did!

A Bientôt.